Saturday, December 31, 2011

Christmas at the Cottage Mini-Album

Hello Dear Blog Friends
My new Bind-It-All arrived this week (yay!) and so I was able to complete a mini-album about our Christmas up north.

Inspired by Susie McGuire at Creative Cafe, this mini will be given as a thank-you gift for my daughter and son-in-law, whose cottage we invade every Christmas. Their cottage is located in very beautiful countryside in the midst of trees and lakes, so I kept to an outdoors-y and woods-y theme.
For the most part, I used the Winter Wonderland papers from Recollections. The papers were just perfect for my woodland theme.
Two tags slide in underneath the deer; on the back there is space for a photo and some journalling. You can also see two sideways tags which pull out for more journalling.
 A long policy envelope (L) and two photo flip books (R).
Many of the Winter Wonderland papers have gorgeous photographic images - above you can see the beautiful sled image on the front of the envelope. 
And on the back, a nice place to record the names of all the friends and family who visited.  Inside the envelope is a long tag with space for some private journalling.
Each flip book holds four wallet-size photos. Here are two interior shots of this cozy and elegant getaway place.  We always feel so lucky to spend time here!
To keep this post from being too long, I'll do a second post tomorrow with the final pages.
Meanwhile, I want to wish everyone all the best for a happy and healthy 2012.  This must surely have been the fastest year ever - it just seemed to whoosh by.  Thanks to each and every person who stopped by, and for taking the time to leave your sweet and encouraging comments.  Paper and ink are two of my creative passions, but truly it is the connections between us all which really matter.
Many blessings, and Happy New Year,

Thursday, December 15, 2011

Christmas at the Cottage: Playing Hearts

Hello Blog Friends
I've been away from my craft desk because I've been spending some time here:

and here:
Now that I've shaken the sand out of my suitcase, I have a very laid- back feeling - an attitude I hope to keep throughout the Christmas season!
Here's a Christmas layout I did using My Mind's Eye Lost and Found Christmas collection:
The photo shows assorted sons, daughters, and my husband playing their annual mega-tournament of Hearts. (Apparently this is an addictive card game; I am no good with cards so I just take pictures!)
I love this collection from MME.  The papers are double-sided and have good weight to them. Gorgeous rich colours, and the glitter does not fall off - very nice to work with.
(Note: Plus it doesn't smell - there are some glittered papers out this year that have such a strong odour from the UV process that I've had to air them out in my garage for 3 weeks. A good reason to buy from your LSS, where you can touch and smell before purchase!)
I found the MME paper is so beautiful with its glittered borders and embellishments, that it seemed to call for a simple treatment.
I  detail-cut the holly leaf so it would overlap the photo at the bottom L:
 I tucked a white doily behind the photo for texture and contrast.
 I adhered a MME embellishment with trim, popped on a bead, a button, a tiny twine bow.

Some  vintage lace trim. two journalling cards, and voila - merry & bright!

We are all looking forward to our Christmas reunion up north, where the fun will start all over again soon.

Sunday, November 27, 2011

Un-Winter Mini-Book

We are in the midst of un-winter around here. The weather is warm and rainy, however DH went to get the snow tires put on today.  Nary a flake of snow in sight.  At least if /when we do get snow, we'll be ready!
I've had my own kind of sudden change, too.  I am suddenly making mini-books.  If I were a tv station, I'd be called "All Mini-Books All the Time".
Don't know where these sudden changes come from, but I'm just having fun following my creative journey.
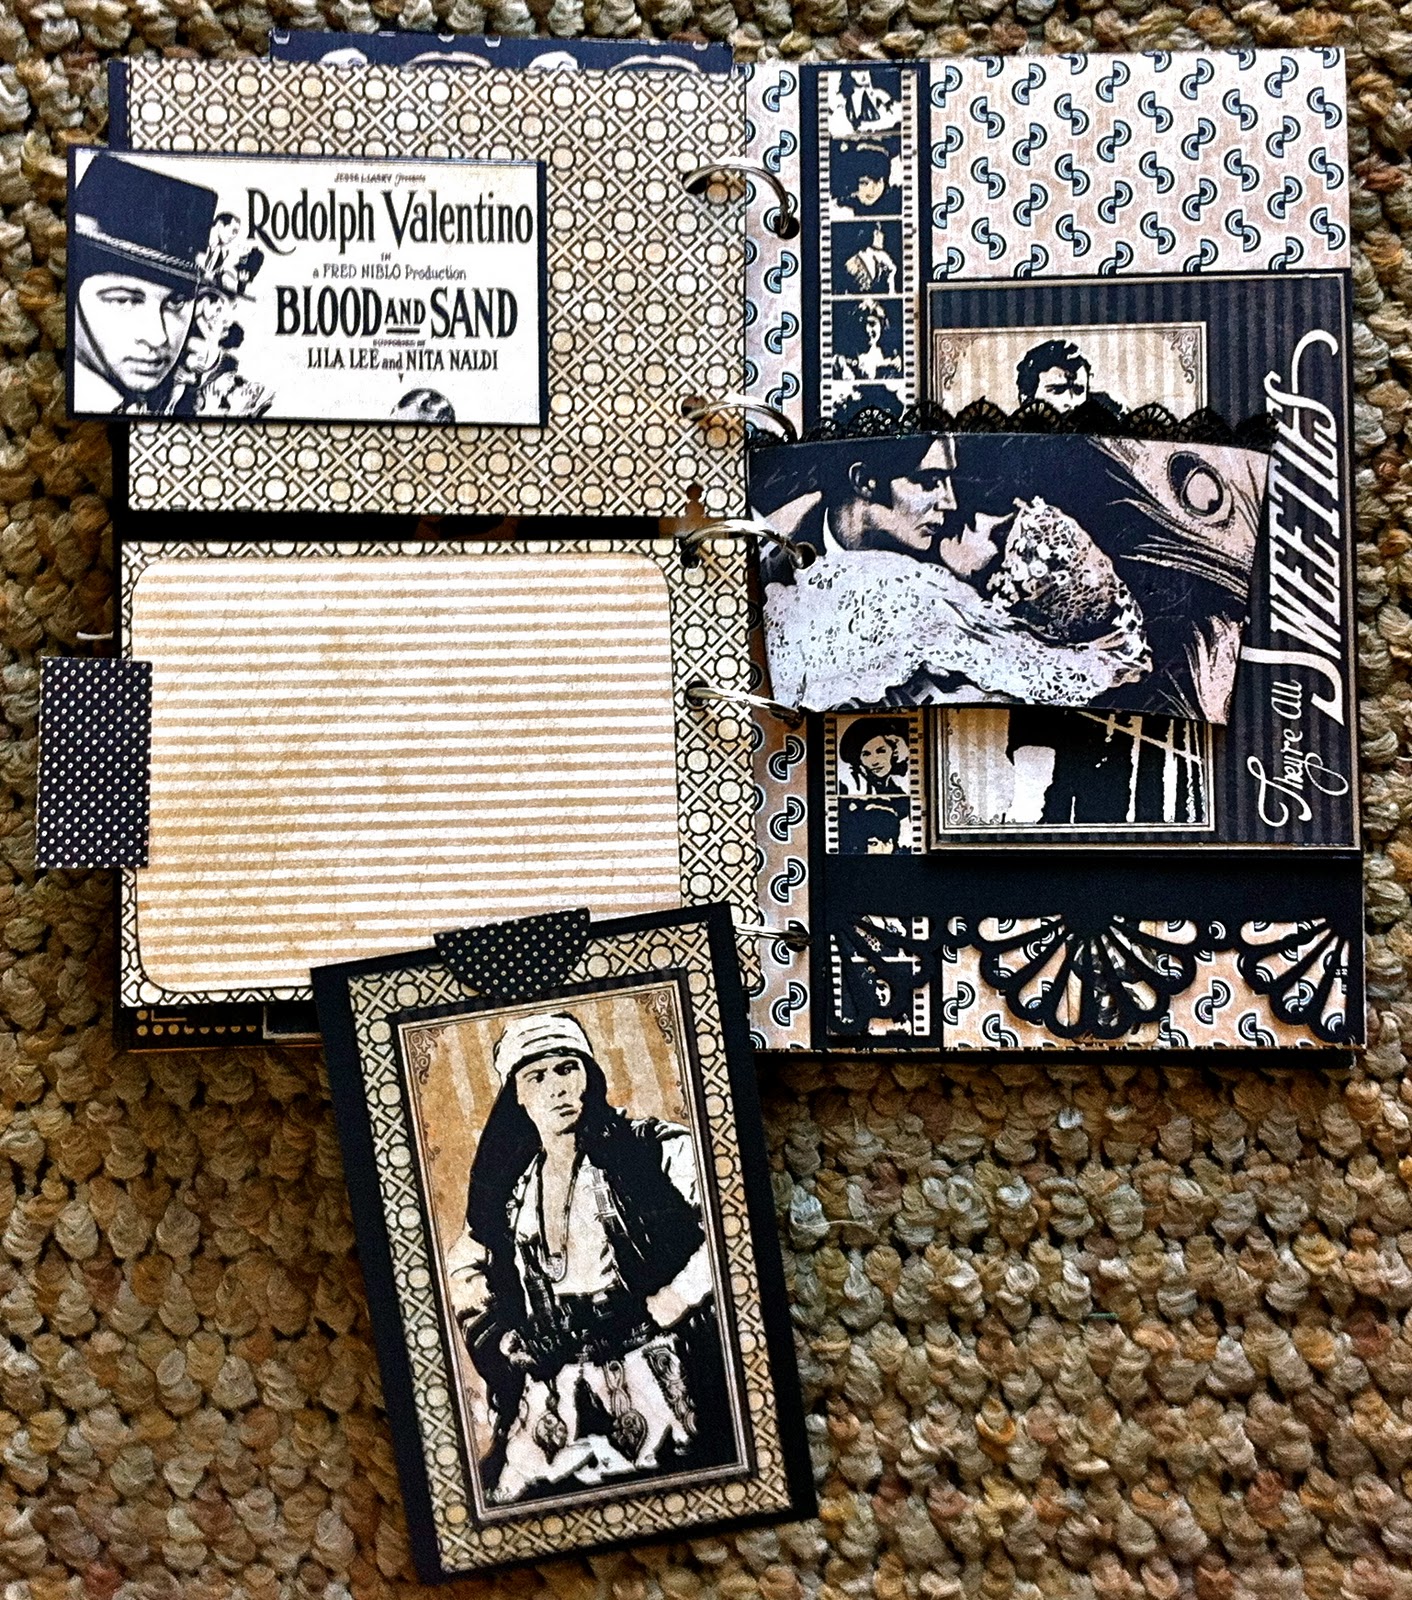
Here's a mini I made using Graphic 45 Curtain Call papers. This was inspired by Susie McGuire's wonderful tutorials over at Creative Cafe.
I called my mini "Director's Cut".  Love the very retro feel of these Graphic 45 papers.
By using kraft cardstock throughout, there's lots of journalling space, which I love.
There are gorgeous tags tucked under flaps like this page:
I kept very close to Susie's tutorial.  
Below left you see an envelope with a private journalling tag inside. On the right are two photo flip books for recording special moments:
This is my favourite page because it's a single image which cleverly splits into two half-pages at the centre point:


There's even a tag holder made out of a coffee cup protector sleeve.You can see it below on the right -the top of it is outlined with black lace trim. See the slightly curved shape of the kissing couple image?
Final page has photo tags as well as some journalling tags:
Two photo tags tuck easily under the long black pocket:
And here's the back cover:

In theory, this was supposed to be bound with a Zutter Bind-It-All.  However, I used O-rings and a Crop-a-Dile for binding, and I was pleased with the result.
I love this mini so much that I've already started writing in it and adding photos.  I have more mini-albums underway, and they will make some nice Christmas gifts.
Do check out Creative Cafe, Susie has lots of unique and easy-to-follow tutorials.
Thanks for stopping by today!

Wednesday, November 16, 2011

Sweet and Simple Vintage Christmas Frames

I love the simple life - especially at Christmas time.   I discovered that by keeping things very simple and streamlined,  it makes Christmas much more enjoyable when it arrives!
Here are some super-simple, sweet, and charming vintage Christmas frames that I made this week:
I got the frames from the dollar bins at Michael's - grand total $4.00. The frames are already painted such beautiful colours,  I only added some coarse glitter to make them shine.
Then I added some jump rings on the backs of the frames, and attached some pearl dangles.  I made the bling-y parts by de-constructing a Christmas garland and attaching pieces of it for an added vintage touch.
And then the most fun part -  I added these beautiful vintage pictures cut from Melissa Frances paper (Attic Treasures collection).
Here's a picture of all 4 frames.
I made two with simple Christmas twine loops, and two with metal swoop hooks. The frames can hang on the tree,  or with the stockings, or anywhere a little Christmas touch is needed.  And that's it - so simple and fun.

Thursday, November 10, 2011

Fall Layout: Sketchabilities #57

Hello Lovely Blog Friends,
It does feel as if autumn has finally come to town.  I'm not a fan of fall temperatures, but I do love the beautiful colours!  Here's a fun fall layout which features all my favourite autumn colours:
This is a photo of my sister-in-law (who is a true fan of fall weather) and my niece in the apple orchard.  For the paper strips, I used the wonderful papers of the Farmhouse Collection by Crate Paper.
I purposely cut the photo into a smaller circle than its orange frame just so that the beautiful colours of the pattern strips could peek through (similar to the way that the colours of the apples peek through the photo of the orchard).  I added three TH clock faces for some contrast and metallic texture.
Who can resist a fresh from the tree apple? Can you see the semi-eaten apple in her hand?
I then fussy cut a few flowers. layering them on some sweet chipboard pieces from my stash. (I even used ledger paper as my background - this is unheard of for me!)
I added three TH clock faces for some contrast and metallic texture. And here's the beautiful sketch from Sketchabilities:
This was a fun sketch to work with, and one which I will use again.
Thanks for stopping by today - if you have a moment to leave a comment, it is very much appreciated!

Saturday, November 5, 2011

Vintage Montreal Style

Hello Lovely Blog Friends
Here in Toronto these days we are so lucky to be having bright sunshine and the clearest blue skies outside of Taos, New Mexico - in November, no less!  
(I seem to remember creating this l/o for a challenge some time ago at OUAS... but I missed the deadline.)  Since we're having such glorious weather,  I thought I would post this summery vintage layout:
"Oh, never mind the fashion.  When one has a style of one's own, it is twenty times better."
The two photos are of my mother and her friends in Lafayette Park in Montreal on a sunny June day. The year is 1946. They are celebrating the end of school and the beginnings of new jobs, new lives right around the corner.
Montreal women (and men, too) are known for their sense of style. I just love their darling outfits and clutch handbags - which you can see in the photo on the left. The Webster's Pages summer handbag motif was perfect for this layout. I added white eyelets and did some lacing with satin ribbon, which I finished in a twisted rose.
I used tiny classic roses and slid this Summer Land poem (Glitz Layer) under the chartreuse chiffon flower.
Dusty Attic frames are painted with white crackle paint.
Looking at these pictures makes me want to go outside and take a walk in the park!
Hope that everyone can enjoy some lighthearted time with good friends this weekend or spend time outdoors.


Thanks so much for stopping by today.

Materials List:
Patterned Paper: Webster's Pages, Pink Paislee
Book Page: Glitz
Chipboard Frames: Dusty Attic
Spellbinders Dies
Journalling Cards: Prima
Flowers: Prima, Recollections

Saturday, October 29, 2011

Honeycomb Accordion Album

Hello Lovely Blog Friends
I've recently  been indulging my passion for making books.  Here is my new Notes & Observations Journal:

It comes from a pattern at : Follow the Paper Trail with Laura. (this particular pattern is called the Honeycomb Accordion Bound Album.) Laura has some pretty wonderful creations there, even an Enchanted Castle mini-book.
I made the whole thing for $11 -  just the cost of the PDF pattern. The rest came from paper I had on hand. How economical of me!
Here's the first page:
I even used up some leftover packaging, as you can see on the inside front cover above. There's lots of space for notes, journalling, and photos. 
There are 5 long pages 3 flip pockets beside every long page. Each pocket has a photo mat insert.
I used up quite a bit of my paper stash. The Tim Holtz  Idea-ology papers were ideal for this project. 
Of course, you can get much fancier and matchy-matchy with this, especially if you are making a gift for someone.  I wanted to see if I could just use some of what I already had on hand.
I mixed it up throughout, using stamps and embellishments for little touches here and there.
This book was fairly easy to put together.  The pattern instructions are clear and give the exact dimensions required for each page. The book is very sturdy. Here's the last page:
There are 5 long pages 3 flip pockets beside every long page. Each pocket has a photo mat insert.
With so many pages and pockets, it can be a treasure trove of photos and journalling.  Personally, I will be using mine to record the lead-up to Dec. 2012, which is supposed to be some kind of amazing date in human history.
Laura also has a YouTube channel and you can follow her UStream classes for step-by-step instructional videos.
Thanks so much for visiting  today.  Hope you are having a lovely weekend with some beautiful scrap time!  Many thanks also for leaving your sweet comments.


Friday, October 21, 2011

Meant To Be: Vintage Layout

This is a vintage photo ca. 1945.  In the photo are my Uncle John, who passed away recently, and his wife.  The scene is Montreal, outside of an old brick walk up on a summer day.
My uncle and aunt were both very special to me.  They were happily married for 45 years, thus the title "Meant to Be". 
I adore old brickwork. I love the way bricks retain warmth and how they light up with inner fire when the sun shines. Radiant warmth and enduring love are the two concepts I wanted to bring out with the intense colour and background design of this Bo Bunny paper.
Here's the sketch by the uber-talented Robin Shakoor:
visit Robin Shakoor here
I used Robin's beautiful sketch and I changed it up a bit: 
I created a split circle directly on the paper using a Prima mask and gesso; then sprayed the bricks with Smooch Spritzes
I arranged it so that there are bricks showing in each of my paper layers to echo the old bricks in this venerable building. I did some light distressing/inking around the edges 
 
and created a small tear for a more aged effect:
There's one Vintage Blue Glitz paper, and I used Dusty Attic corner pieces.  I carefully cut the second one into two pieces, one to highlight the upper left corner of the photo, and the second piece as a frame for names and date.
This fabulous 7Gypsies metal embellishment reminded my a military medal, similar to the pilot's wings on my uncle's uniform:
Personal Quest
It's my personal quest to complete 15 vintage/heritage layouts this year; this is No. 10. It was also entered into the Scrap That! October Challenge. 
Coming Soon 
I've come to the conclusion that for me, scrapbooking is 50% art: the paper, ink and all the awesome embellishments available to us...but that is only half the story.  
The other 50% is the story-telling.  Each of the people in the photos has a story to tell, and I love telling the story in words as much as I love creating layouts.  I will be adding a additional page to my blog where readers can go for the stories of the people in the photograph, and I'll be starting with my Uncle John.  Not sure how long this will take me, but my goal is to have it up and running by the end of November.

Thanks so much for stopping by, and happy scrapping this weekend. 
I invite you to leave a brief comment - your sweet comments add so much meaning and connection in this virtual blogspace!

Materials List:
Patterned Paper - Bo Bunny, Timepiece Collection, Tick Tock; Timepiece
7gypsies metal embellishment: "Watch Face", Time Flies
Glitz Paper Layers, Vintage Blue
Smooch Spritz - Pralines & Cream, Tea Party